Sedona is a hiker’s paradise. The red rock scenery is truly unreal and its convenient location to Flagstaff and Phoenix make Sedona a great day or weekend destination!
My husband and I spent about 3 days hiking in Sedona (we were visiting my sister in Flagstaff so we just drove in each day) and just scratched the surface of all the amazing hikes here. Unless you have weeks to spend exploring, you’re probably also looking for a realistic number of hikes to do in just a few days.
I spent a lot of time researching the hikes in Sedona that we wanted to check off our bucket list. Sedona has exploded in popularity recently, so finding parking at the trailheads and getting photos without hordes of people in them can be tricky.
Additionally, there are often multiple ways to hike to a specific viewpoint, which can make navigating the trails a little difficult.
That’s why I created this Sedona hiking guide. Here are 10 incredible hikes in Sedona, including parking information, trailhead navigation, tips, and more to help you make the most of your itinerary!

The Best Time to Go Hiking in Sedona
The best time to go hiking in Sedona is in the spring and fall, when temperatures aren’t too hot yet. Unfortunately, this is also the busiest time to visit.
We visited in late March/early April and planned our hikes mostly on weekdays. We were able to find parking at most of the trailheads, but it was busy.
Sedona could also be a great destination to visit in the winter, especially if you like hiking. The crowd levels are at their lowest and temperatures will be cooler which is perfect for hiking. Highs during the winter months are typically in the 50’s and 60’s.
Sedona does get a little bit of snow during the winter, but it usually doesn’t last long on the roads. It would be really cool to see the red rocks with a light dusting of snow!
Related: The Ultimate 9-Day Northern Arizona Road Trip Itinerary
How Many Days Do You Need in Sedona?
If you like hiking, you could spend weeks in Sedona and still be hiking new trails. I’m seriously already planning a trip back so we can keep hiking!
If this is your first visit and you enjoy hiking (I’m assuming you do, since you’re reading this post), planning 2-3 days will give you enough time to hike 5-6 trails and visit some of the shops and restaurants in Sedona.
If you don’t like hiking, 1-2 days here is really all you need.
Related: Flagstaff Area National Monuments: How to See Them All in One Day
Fees & Passes Information
Even though the hikes in Sedona aren’t located in a National Park, you will need a Red Rock Pass for some of the hikes on this list. The Red Rock Pass is a program to help protect and maintain the landscapes in Arizona.
There are daily, weekly, and annual options for $5, $15, and $20, respectively. You can purchase one at the kiosks located in the parking lots of some of the trails or online here.
The America the Beautiful National Parks Pass will get you into most of the hikes in Sedona as well. There are just a few places where the National Park Pass isn’t accepted and you’ll need to purchase an additional Red Rock Pass.
If you plan to visit more than 3 National Parks or Monuments on your trip to Arizona (or within one year), getting the America the Beautiful National Park Pass will save you money vs. paying the separate fees at each park. It costs $80 and you must order ahead of time as they will ship you a physical pass.
I’ve denoted pass information for each hike listed below. I suggest getting the National Parks Pass and hanging it in your windshield every time you go hiking just to be safe!
Note: In many places in Sedona, you are not allowed to park along the road if the trailhead parking lot is full.
Sedona Shuttle Information
Since hiking in Sedona has exploded in popularity, the city started a free shuttle program to take hikers to the most popular trailheads around town.
There are 4 different lines that run from 7 am to 5:30 pm. During peak season, it runs every day. The shuttles are completely free and don’t require reservations.
You can download a map of all the shuttle locations on the Sedona Shuttle website here.
We didn’t end up needing to use the shuttle, but it can be a good option, especially during peak season when parking is tight.
10 Amazing Hikes in Sedona
With just 3 days in Sedona, we did not get to all of the amazing hikes on our list. You could literally spend weeks out here and still not get to all of them!
However, you probably don’t have weeks to spend here either and are looking for a realistic list of hikes to do in just a few days. Most of the trails on this list are easy to moderate and relatively short, so you can do multiple hikes in one day.
Most of the hikes in Sedona are relatively flat until the very end, where there is rock scrambling.
All of the distances shown below are for the round-trip hike and are in no particular order.
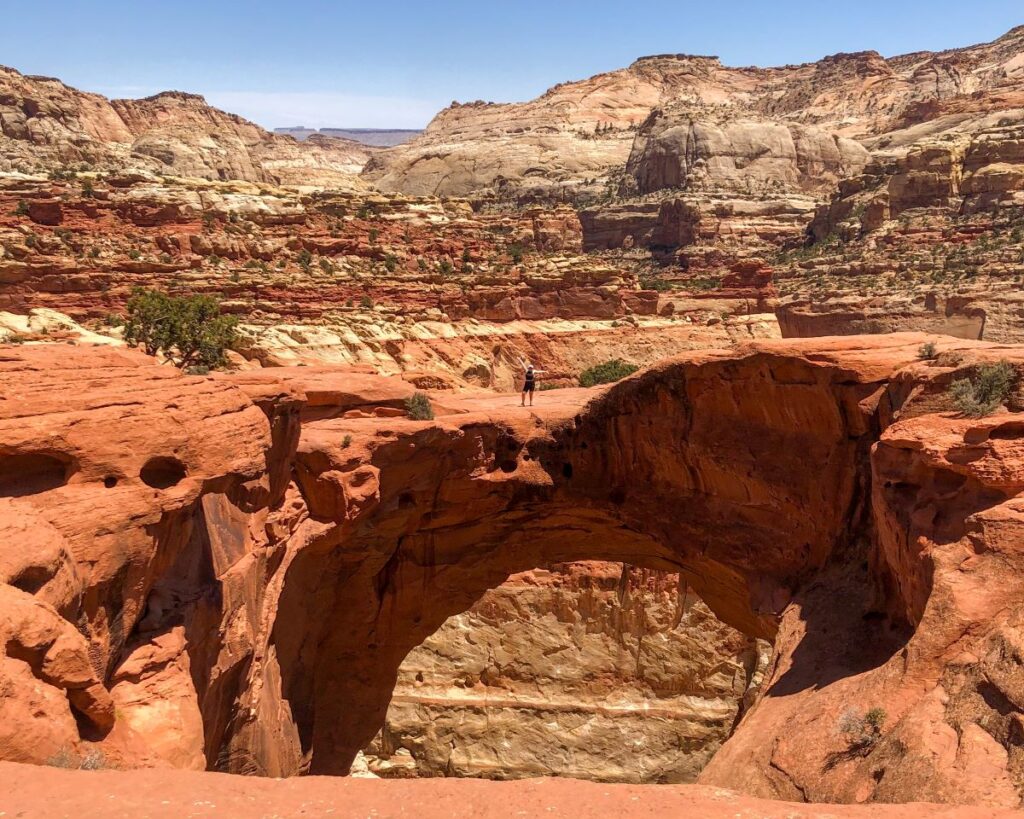
1. Devil’s Bridge
Length: 3.9, 5.7, or 2 miles
Elevation gain: 528 feet
Type: out-and-back
Difficulty: moderate
Time: 2-3 hours
Trailhead location: Mescal Trailhead, Dry Creek Road, or Devil’s Bridge Trailhead (high clearance 4×4 required)
Red Rock/National Pass Required?: Yes, both accepted and required at all trailheads
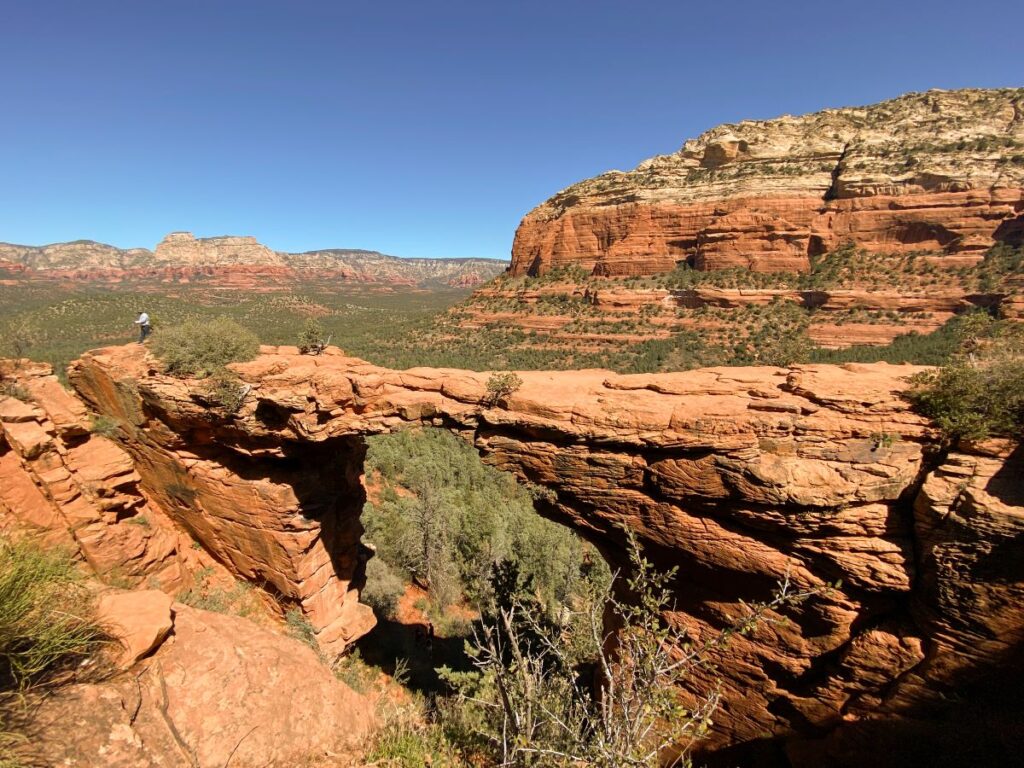
If you’re looking for the most iconic Sedona hike, look no further than Devil’s Bridge. Devil’s Bridge is an insanely popular trail that takes you to the largest Sandstone Arch in Sedona. There are gorgeous views along the way too.
Because of the popularity, it can be a little tricky navigating the trail and parking. There are 4 different ways to hike to Devil’s Bridge, but the best and most direct way is via the Mescal Trail unless you have a high-clearance 4×4. Check out my guide to hiking to Devil’s Bridge if you want more details on how to navigate this trail.
My biggest tip for hiking to Devil’s Bridge is to start very early in the morning or go late in the afternoon, preferably on a weekday. I’m talking before 8 am or after 4 pm. The line to take a photo at Devil’s Bridge gets extremely long midday (we were there at 11 am and it was an hour just waiting in line for a photo).
Despite the challenges of crowds and parking, this trail is still worth it.
Related: How to Hike to Devil’s Bridge in Sedona, Arizona
OUR EXPERIENCE: This was actually the first hike we did in Sedona. We stopped by Sedona on our way to Flagstaff from the Phoenix airport and actually found a parking spot at the Mescal trailhead around 10 am on a Thursday in late March. The line for photos at Devil’s Bridge was insanely long, so we took a photo off to the side instead.
2. Birthing Cave
Length: 1.9 miles
Elevation gain: 242 feet
Type: out-and-back
Difficulty: easy until you get to the Birthing Cave, then moderate
Time: 1-1.5 hours
Trailhead location: Long Canyon Trailhead
Red Rock/National Pass Required?: Not required
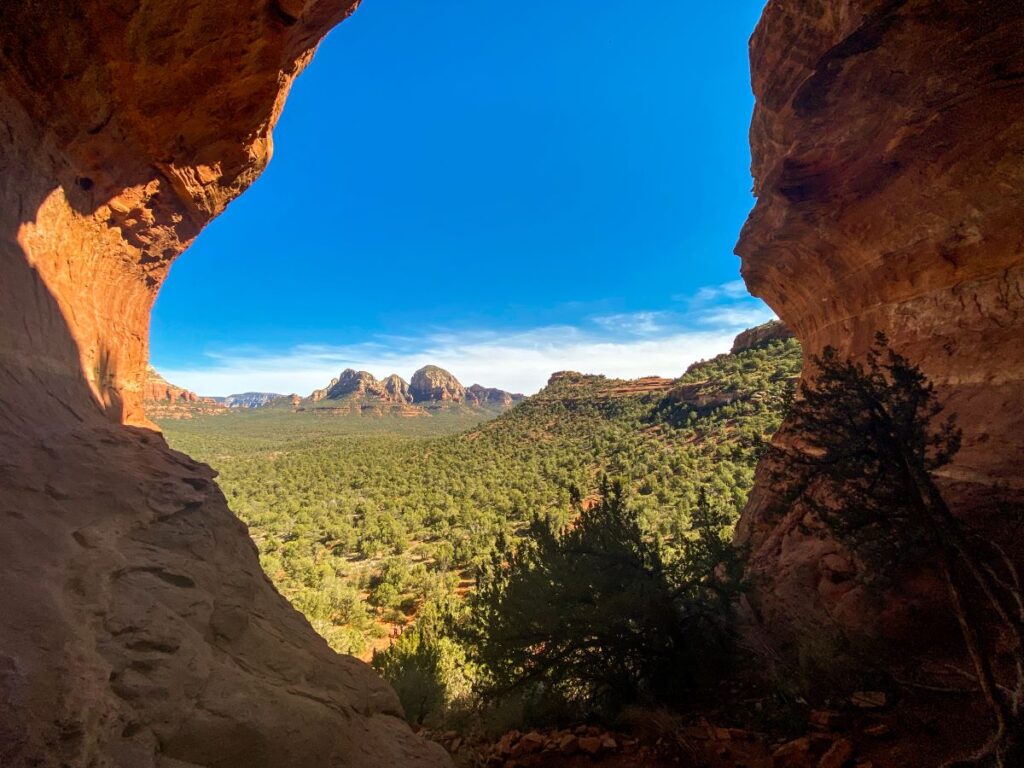
The Birthing Cave hike is an easy hike through a flat, sandy wash up to the Birthing Cave (you will understand why it’s called that when you see it). From inside the cave, you have a gorgeous view of the red rocks out to the distance.
The only tricky part about this hike is making sure you turn left onto the more narrow trail when you get to the fork in the road. You will see a heart-shaped cave as you walk up this trail so you know you’re going the right way.
This trail clocks in at just under 2 miles round trip and can be done in an hour if you’re quick.
The hike is easy until you get to the cave, which requires climbing up the steep cave walls to get to the best viewpoint. The cave walls are pretty slippery, so I recommend wearing hiking shoes with good traction.
Be very careful when you’re climbing in the Birthing Cave. We chose to take our photos from the side of the cave instead of climbing up higher because we just weren’t comfortable. No photo is worth the risk of falling!
This hike is phenomenal for photography and is best done in the late afternoon when the afternoon sun is illuminating the red rocks you see from inside the cave.
This is another popular hike, so waiting until later in the afternoon will mean less people crowding your photos!
OUR EXPERIENCE: We did this trail in the late afternoon on a Thursday at the end of March and didn’t have trouble finding parking. There were a few people in the cave, but it was very manageable!
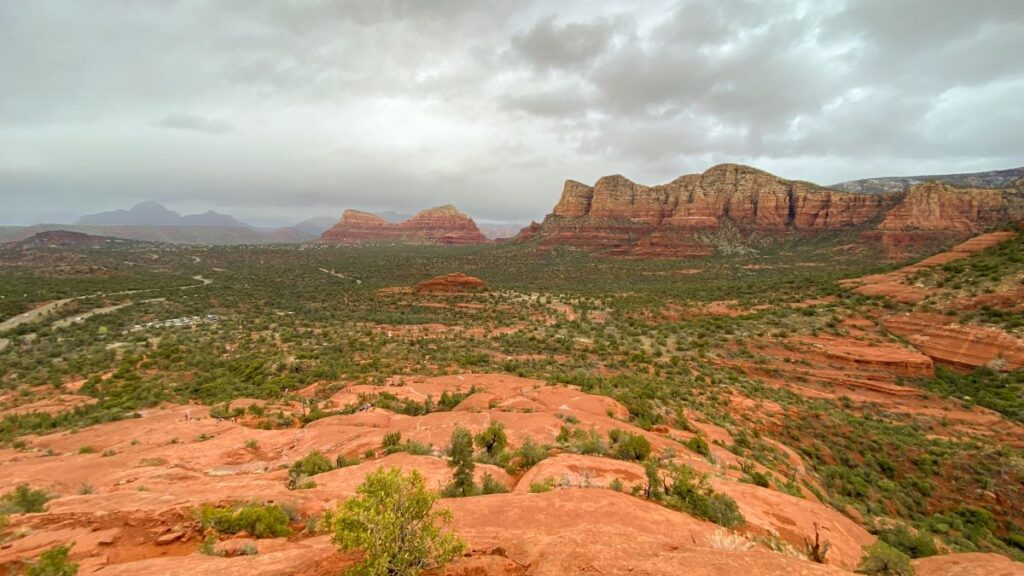
3. Courthouse Butte & Bell Rock Loop
Length: 3.6 miles
Elevation gain: 341 feet
Type: loop
Difficulty: easy
Time: 1.5-2 hours
Trailhead location: Bell Rock Trailhead North, Bell Rock Trailhead South, or Yavapai Vista Point
Red Rock/National Pass Required?: Yes, both accepted and required at all trailheads
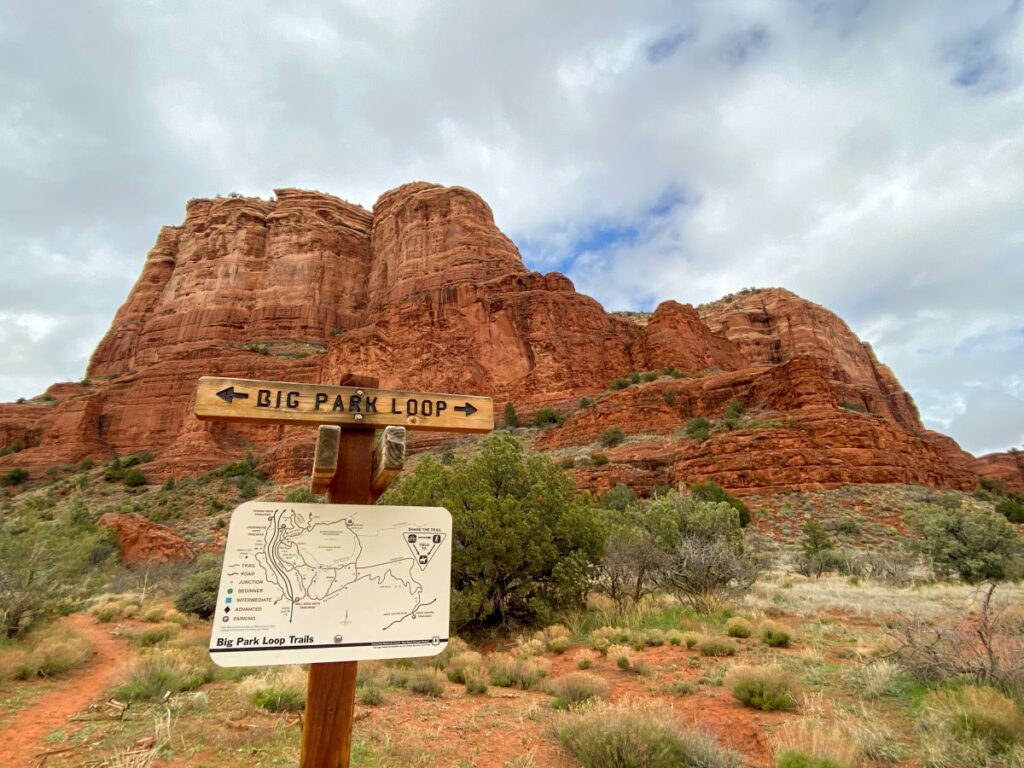
This hike is an easy stroll around 2 of Sedona’s most iconic red rock features: Bell Rock and the Courthouse Butte. Add on a climb up Bell Rock and you have the ultimate Sedona adventure!
There are 3 parking lot options for this trail plus the option to add on the Bell Rock Climb. If you want to learn more about navigating this trail, check out my Bell Rock & Courthouse Butte hiking guide.
This trail is a little confusing to follow, as there are multiple loops that go around the Courthouse Butte. There are lots of signs and maps, so I recommend taking a photo of the map to keep track of where you’re at.
You can hike this trail clockwise or counterclockwise. Where you park and if you plan to hike up Bell Rock may influence your decision (do you want to climb Bell Rock at the beginning or end of your hike?).
Related: Bell Rock & Courthouse Butte Loop: The Ultimate Hiking Guide
OUR EXPERIENCE: We did this hike in the late afternoon just after a rainstorm, and got caught in a little bit of rain during the second half. Despite the rainy day, we still struggled to find parking at first at the Bell Rock South lot. We hiked counterclockwise and saved the Bell Rock climb for the end. I absolutely loved this hike and it was fun seeing the rock formations get larger as you hiked closer to them!
4. Bell Rock Climb
Length: 0.8 miles
Elevation gain: 609 feet (AllTrails has the elevation gain wrong)
Type: out-and-back
Difficulty: moderate to strenuous
Time: 1 hour
Trailhead location: Bell Rock Trailhead North, Bell Rock Trailhead South, or Yavapai Vista Point
Red Rock/National Pass Required?: Yes, both accepted and required at all trailheads
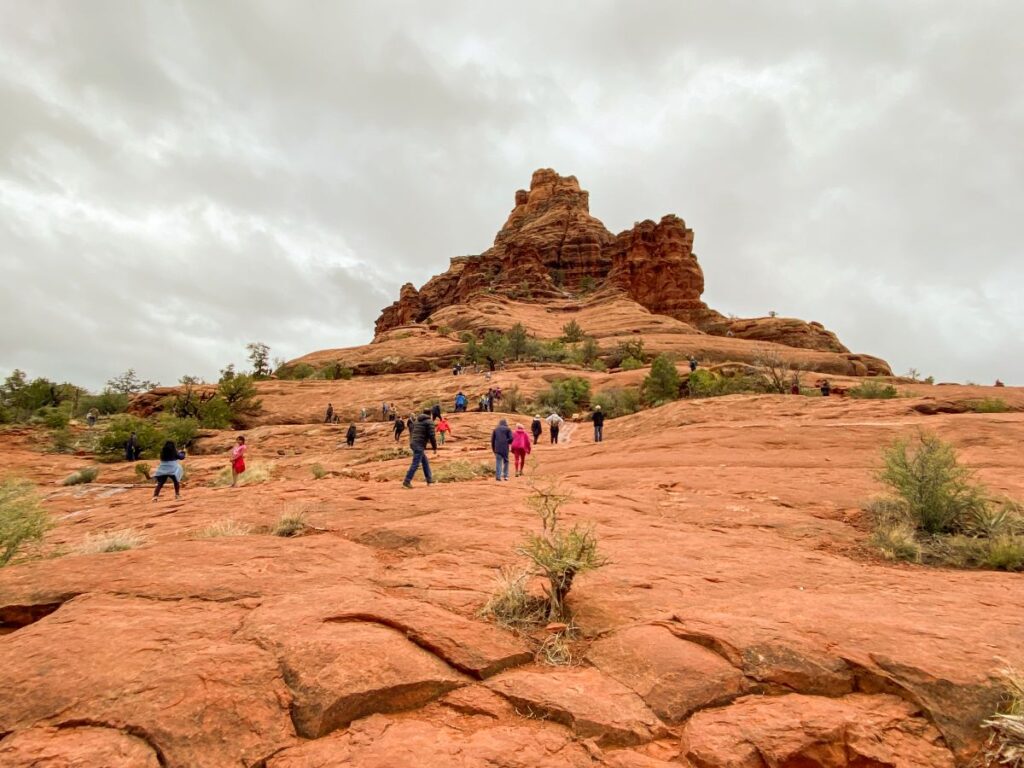
Climbing Bell Rock was an absolutely exhilarating experience. Follow the signs for Bell Rock and get to climbing!
At first glance, this hike seems really intimidating since the rock is so tall, but the layers make it easier to zig zag your way up. There isn’t a defined trail up to the top, so have fun strategizing the best path up. If you go midday, there will be people all over this rock so bring your patience!
The nice thing about this trail is that you don’t have to go all the way to the top if you don’t feel comfortable. You can still get some fantastic views part of the way up. The scramble does get more strenuous and steep the further you go.
This is one of the most popular things to do in Sedona, so going early or late in the afternoon is best if you want to find parking and minimize crowds.
The parking situation is the same as the Courthouse Butte Loop, but the Bell Rock North lot is the closest lot to the trail.
OUR EXPERIENCE: We did this climb in combination with the Courthouse Butte Loop on a rainy weekday and it was pure chaos. I’m sure it wasn’t as busy had it been a clear day, but there were tons of people climbing this rock with us. I won’t lie, I did get a little nervous at some points climbing this rock. I’m not sure if the rain made the trail a little more slippery or not, but I struggled to get traction in my hiking shoes at some places. The views are incredible so it is definitely worth it!
5. Airport Loop
Length: 3.3 miles
Elevation gain: 429 feet
Type: loop
Difficulty: easy
Time: 2 hours
Trailhead location: Airport Mesa
Red Rock/National Pass Required?: Not required, but there is a separate fee to park at the Airport Lot
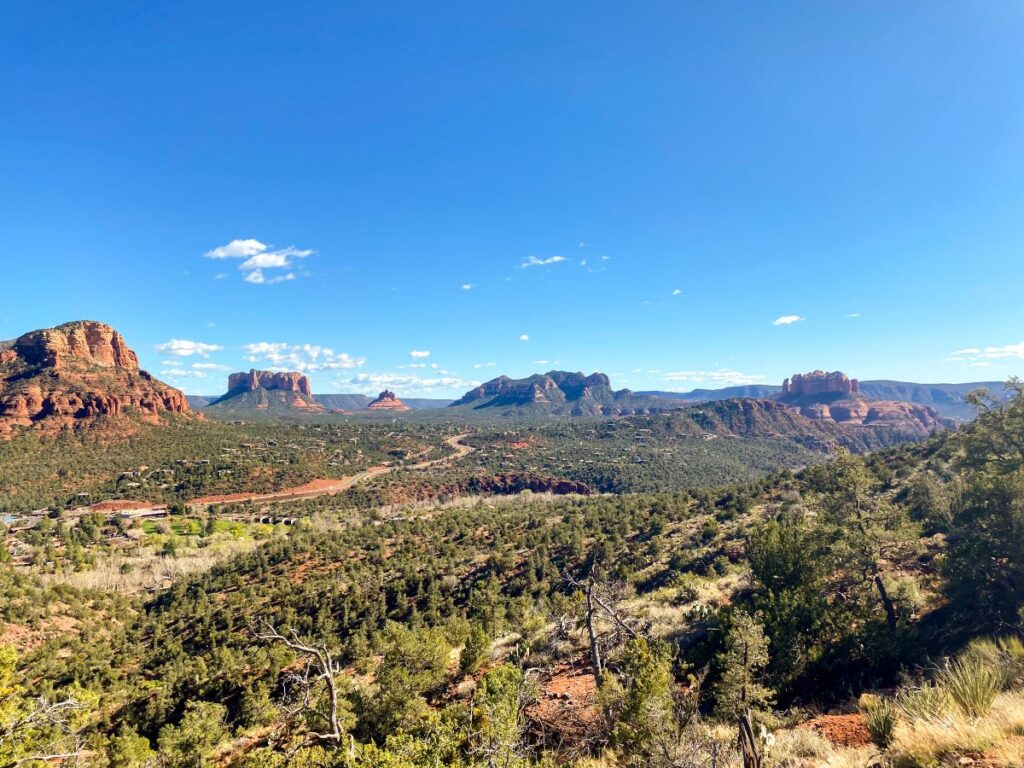
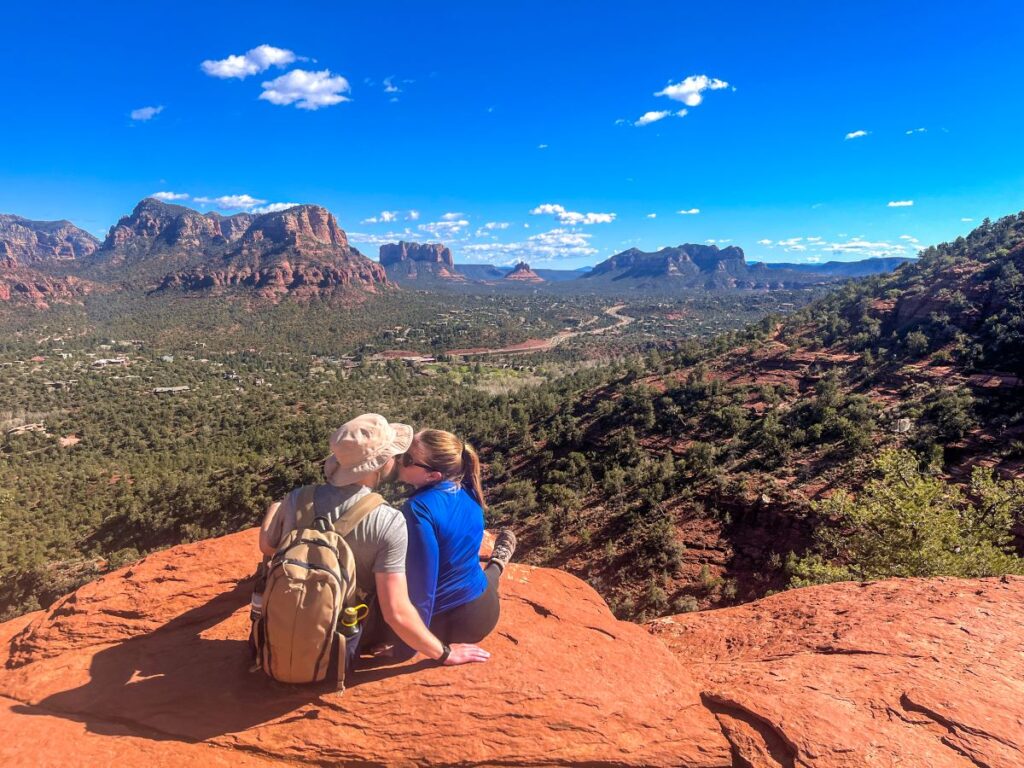
The Airport Loop Trail circles the Sedona Airport Mesa and provides stunning panoramic views over Sedona and of Bell Rock, Courthouse Butte, and Cathedral Rock. This is the trail to get a photo of all 3 famous red rocks!
This is a fantastic hike to do at sunset. Grab dinner at the Sedona Airport Mesa Grille (reservation required) and then do a post-dinner stroll around the airport mesa at sunset.
The parking for this trail is extremely limited. There is a small lot right off the road but it fills up really quick. There is additional parking at the airport for $3 and a walking trail that connects to the official Airport Loop Trail, so that is a great back up parking option.
Even if you don’t want to hike the entire 3.3 miles or are short on time, I recommend hiking at least half a mile counter clockwise to see the 3 red rocks from the trail. There is a short trail from the main parking lot up to the Airport Summit, and the Airport Loop trail spurs off of that. If you park at the airport, you will have to hike further to get this view.
You might also get lucky and see a plane or two land or take off!
OUR EXPERIENCE: We were lucky enough to snag a parking space at the Airport Mesa before our dinner reservation at the Mesa Grille in the late afternoon on a Tuesday in early April. We hiked up to the Airport Summit and then about a quarter of the way around the Airport Loop before retracing our steps for dinner.
6. Fay Canyon
Length: 2.4 miles
Elevation gain: 298 feet
Type: out-and-back
Difficulty: easy
Time: 1 hour
Trailhead location: Boynton Pass Road
Red Rock/National Pass Required?: Yes, both accepted
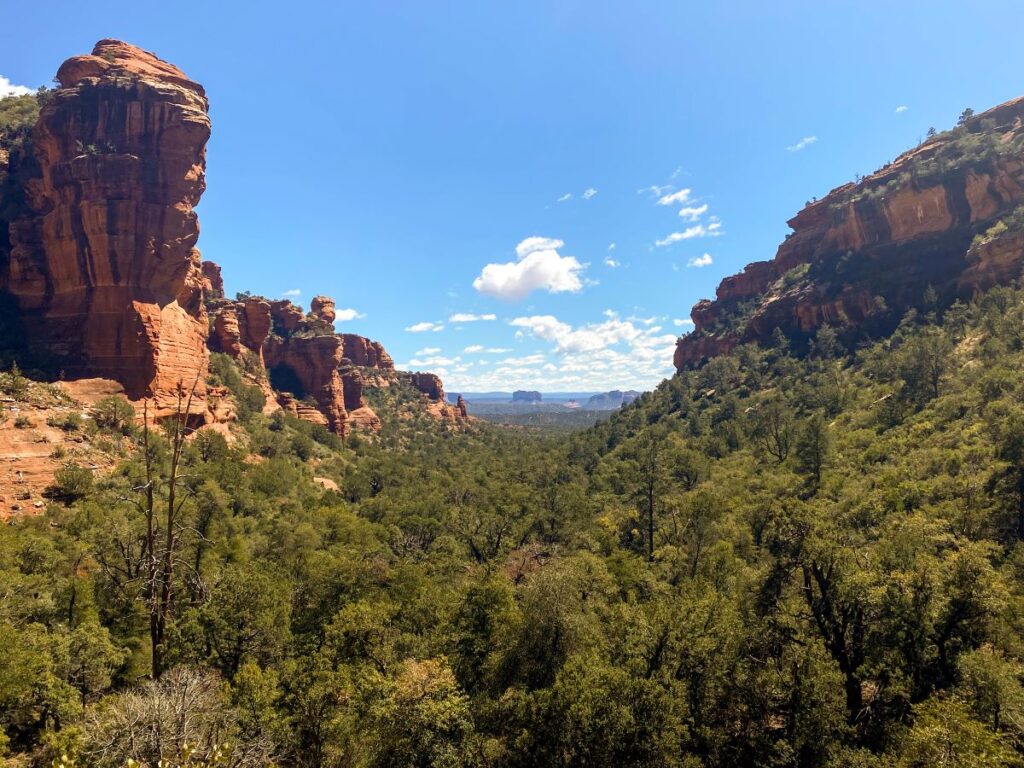
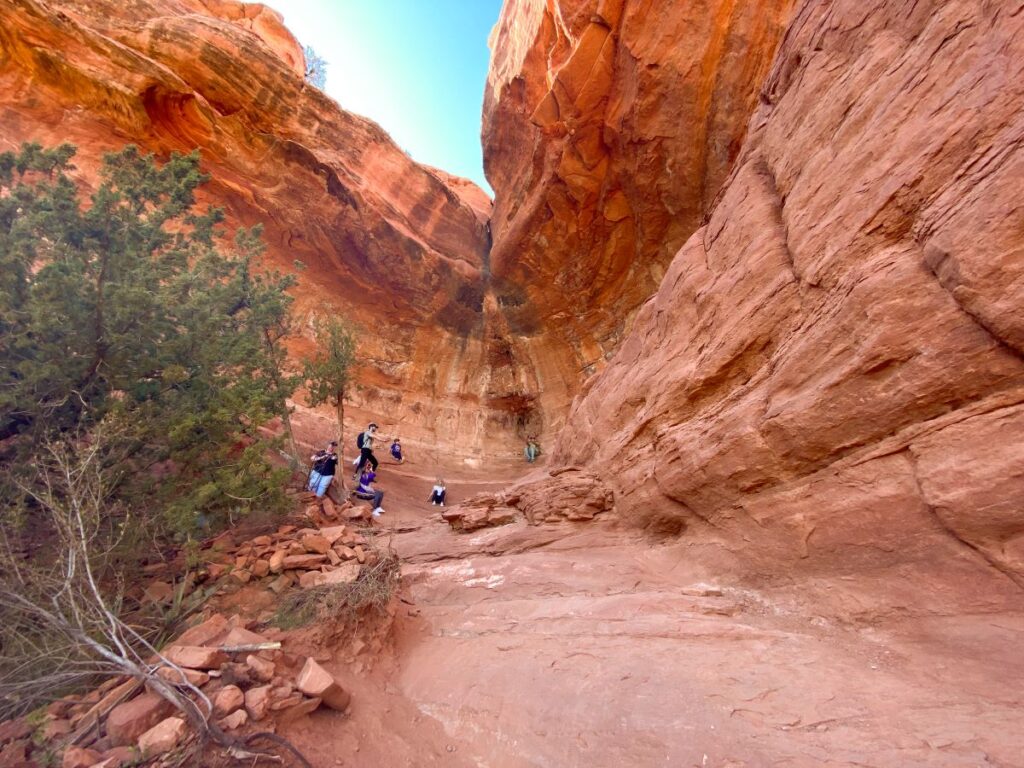
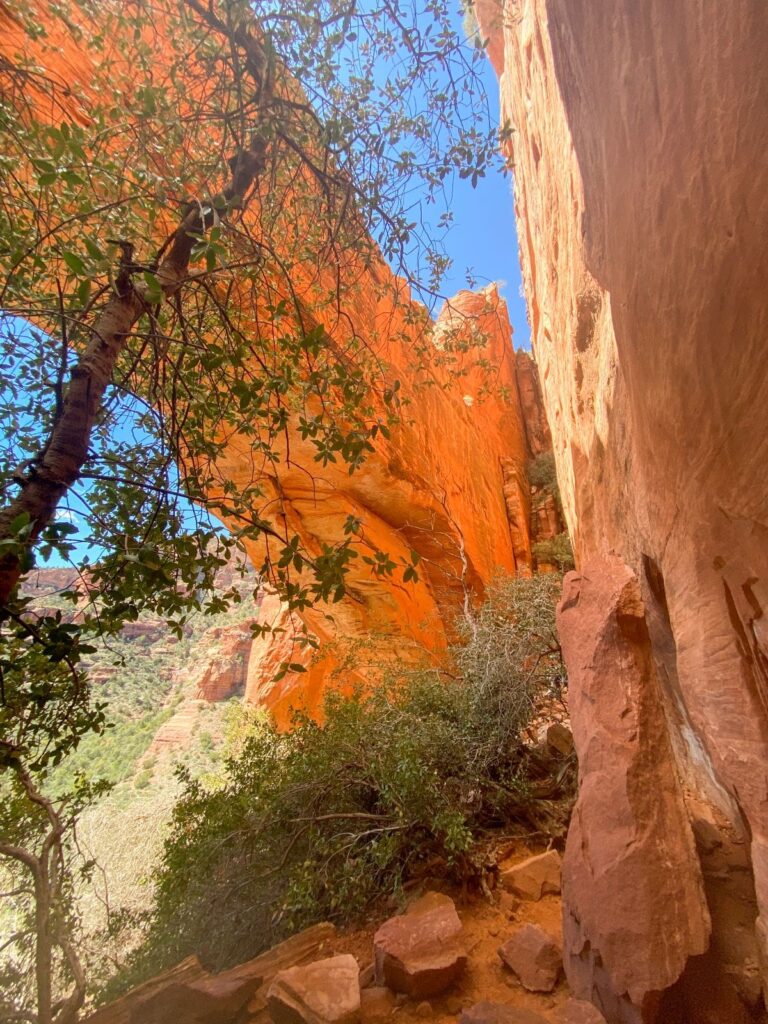
This is one of the few trails we hiked in Sedona that had some shade! You’ll hike through a shady canyon to a section of boulders that you can scramble up with a nice view of the canyon and Sedona scenery. Way out in the distance you’ll be able to see Bell Rock and the Courthouse Butte.
Fay Canyon also is a rare trail that has plenty of parking in a large lot. Overflow parking is allowed along Boynton Pass Road, so this is a good hike to do midday.
You’ll know you are at the end of the trail when you see the “End of Trail” sign right before a rock scramble up to a viewpoint.
In my opinion, this hike is only worth it if you do the rock scramble at the very end. It’s not too strenuous and easy to maintain 3 points of contact. However, if you aren’t a fan of heights or scrambling, you won’t get any scenic views on this trail. It is a nice, shady walk though, which is rare to find in Arizona!
OUR EXPERIENCE: We did this hike combined with the Fay Canyon Arch Trail midday on a Tuesday with my sister who had done it before. We really enjoyed scrambling up the rocks at the end of the trail and enjoying the view! The parking lot was full but we were able to find a spot along the road not too far away.
7. Fay Canyon Arch
Length: 1.5 miles
Elevation gain: 246 feet
Type: out-and-back
Difficulty: easy to moderate
Time: 1 hour
Trailhead location: Boynton Pass Road
Red Rock/National Pass Required?: Yes, both accepted
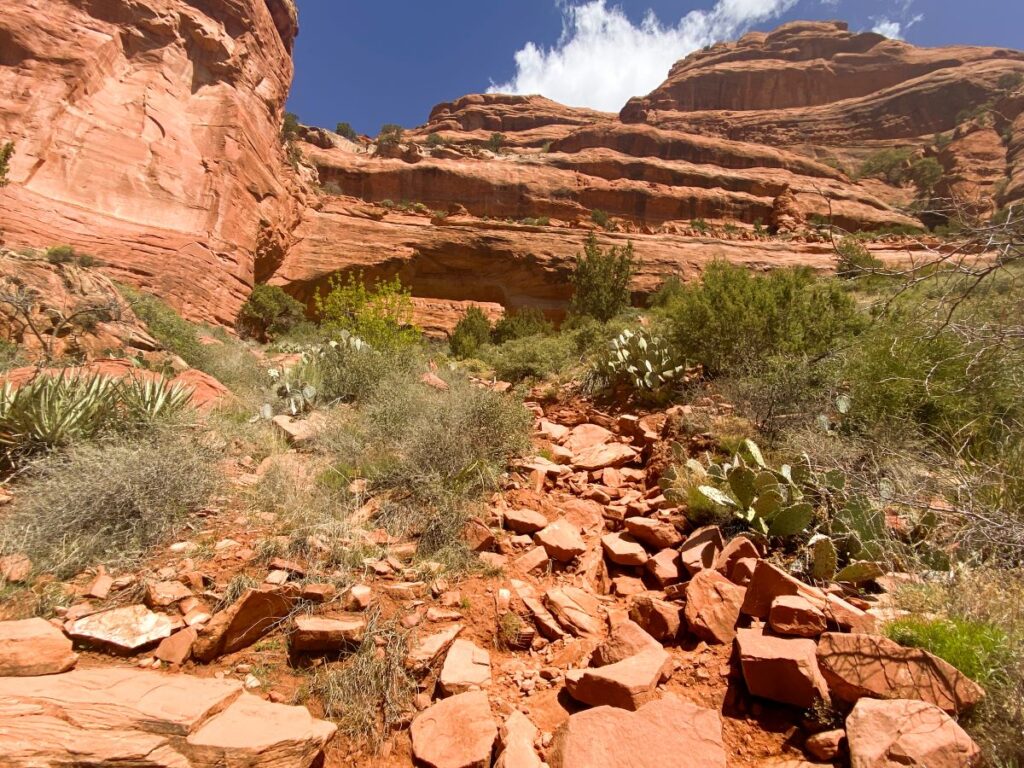
The Fay Canyon Arch Trail shares most of the trail with the regular Fay Canyon hike, but you’ll veer off to the right about halfway down the trail, cross Dry Creek, and then hike up to a natural arch instead of going straight.
The arch trail is not marked and is easy to miss. I recommend downloading the AllTrails map and checking it frequently as you hike.
The hike up to the arch after crossing Dry Creek does get quite steep and there are some overgrown cacti that you’ll want to watch out for, which is why I rated this trail moderate instead of easy. We stopped multiple times to catch our breath on this trail!
When you first start climbing up, you won’t see the arch right away, but keep hiking and it will reveal itself to you!
You’ll also have the opportunity to hike up on top of the arch and take in the panoramic views of the canyon.
This hike is easy to combine with the regular Fay Canyon Trail. I’d recommend hiking up to the arch first on your way in and then finish the rest of the Fay Canyon Trail. The hike up to the arch is the most strenuous portion, so it’s nice to get that part out of the way first.
I’d estimate that doing both hikes results in a total of 3.5 miles with a total elevation gain of 500 feet.
It took us about 2 hours for both, which included lots of stops for photos. The most difficult part is hiking up to the arch, but it is well worth it!
OUR EXPERIENCE: We did this hike combined with the Fay Canyon Trail midday on a Tuesday with my sister who had done it before. We still had some trouble finding the turnoff for the arch, so navigate carefully! The parking lot was full but we were able to find a spot along the road not too far away.
8. Cathedral Rock Climb
Length: 1.2 miles, 3.8 miles, or 4.3 miles
Elevation gain: 741, 935, or 1010 feet
Type: out-and-back
Difficulty: strenuous
Time: 2 hours
Trailhead location: Cathedral Rock Trailhead, Baldwin Trailhead, or Crescent Moon Picnic Site
Red Rock/National Pass Required?: Yes, both accepted at the Cathedral Rock and Baldwin trailheads, separate fee required for the Crescent Moon Picnic Site
If you enjoyed the Bell Rock Climb, you will love climbing Cathedral Rock! Scramble up the steep rock formation to be rewarded with jaw-dropping panoramic views.
This is another extremely popular trail. The Cathedral Rock parking lot trailhead on Back O Beyond Road actually closes between Thursday and Sunday, meaning the only way to access this trail is via the Sedona Shuttle or one of the other longer hike options.
From what I’ve read, it seems like people have the best luck finding parking at the Baldwin lot.
This trail is still on our list of hikes to complete in Sedona. The parking logistics made it really tough to do with our itinerary, especially since we were commuting from Flagstaff. This hike consistently ranks at the top of the list of best hikes in Sedona, so I can’t wait to come back and hike this trail!
9. Subway Cave
Length: 7 miles
Elevation gain: 1000 feet
Type: out-and-back
Difficulty: moderate
Time: 3-4 hours
Trailhead location: Boynton Pass Road
Red Rock/National Pass Required?: Yes, both accepted
The Subway Cave is located off the Boynton Canyon Trail. Hike along this trail and then turn off to the right about 2 miles in to get to the Subway Cave. This is a relatively flat hike until you get to the cave which requires some rock scrambling.
Parking is located off of Boynton Pass Road, and overflow parking is allowed along the street. This is another very popular trail, so going early or in the late afternoon can help with parking logistics.
The photos from this cave look amazing, and I can’t wait to come back and hike this trail one day!
10. Soldier Pass
Length: 4.5 miles
Elevation gain: 856 feet
Type: out-and-back or loop via Brins Mesa Trail
Difficulty: moderate
Time: 3 hours
Trailhead location: Soldier Pass Trailhead off Forest Service Road 9904 or Jordan Road Trailhead
Red Rock/National Pass Required?: No at the Soldier Pass Trailhead, yes at the Jordan Road Trailhead
The Soldier Pass Trail is a moderate hike that takes you past some stunning landmarks and red rock scenery. There is an option for an out-and-back hike or a loop trail via the Brins-Mesa Trail.
You’ll see Devil’s Kitchen Sinkhole, the 7 Sacred Pools, the Soldier Cave, and Soldier Pass. Hike to one or more of the landmarks and then turn around for an out-and-back hike, or keep going and finish the full loop.
The Soldier Pass Trailhead lot is extremely small and only has 14 spaces. It is located in a residential neighborhood so there is no overflow parking allowed on the street.
You can also take the Sedona Shuttle here, so I recommend doing that or parking at the larger Jordan Road Trailhead when planning to do this hike. You will need a Red Rock or National Parks Pass to park here and it’s a bit longer walk to the viewpoints, but it’s probably worth it to have an easier time parking.
Again, I can’t wait to hike this trail and come back to update this post with photos!
Tips for Hiking in Sedona
Be flexible. If the hike you plan to do has a full parking lot, head to a less popular trailhead or take the Sedona Shuttle instead.
Get an early start and/or wait until late afternoon. We structured our days in Yellowstone this way and it worked out really well to avoid the crowds. Start early, rest or shop during the middle of the day, and then head back out around 4 pm.
Wear sun protection. With very few exceptions, hiking in Arizona is out in full sun. Bring sunscreen, hats, sunglasses, and plenty of water on your hikes.
Wear good hiking shoes. They will help a lot with the rock scrambling portions of the hikes!
Best Hikes in Sedona With Limited Time
With just one day in Sedona, I suggest hiking to Devil’s Bridge early in the morning and then picking between the Birthing Cave or Airport Loop for a late afternoon hike.
If you have two days, spend the first day hiking to Devil’s Bridge and the Birthing Cave. Hike the Courthouse Butte & Bell Rock Loop with the optional climb up Bell Rock in the morning of day 2, and then spend the late afternoon hiking the Airport Loop.
I hope this post helped you plan a list of hikes to do in Sedona! This list truly just scratches the surface of beautiful trails to hike, but it’s a great start to a wonderful trip to Sedona.
Which hike are you most excited for? Let me know in the comments below!
More Information on Arizona
ARIZONA ROAD TRIP: This 9-day northern Arizona road trip that starts and ends in Phoenix takes you to Sedona, The Grand Canyon, Petrified Forest National Park, Flagstaff, Monument Valley, Antelope Canyon, Horseshoe Bend, and more!
THE GRAND CANYON: One of the 7 wonders of the world, a trip to the Grand Canyon is a must. Check out my ultimate guide to visiting the Grand Canyon South Rim or learn how to visit the Grand Canyon in the winter.
FLAGSTAFF, AZ: Located in the heart of northern Arizona, Flagstaff is a neat little town that makes a great home base for exploring the nearby attractions. There are 3 incredible National Monuments within an hour drive, Lowell Observatory, and plenty of other things to do. Make sure to check out the brewery trail while you’re in town!
PAGE, AZ: Page makes a perfect long weekend destination and is packed with famous attractions like Horseshoe Bend, Antelope Canyon, Lake Powell, and more. Check out the top 12 things to do in Page to help you plan your visit!
PETRIFIED FOREST NATIONAL PARK: Petrified Forest is a highly underrated National Park that you can visit in one day with fascinating geology and unreal scenery. It’s a 3-hour drive from the Grand Canyon and makes a great road trip stop. Check out my guide to Petrified Forest here.
SAGUARO NATIONAL PARK: Located in Tucson, walk among the nation’s largest cacti. It is a 5 hour drive south from Petrified Forest.
MONUMENT VALLEY: Incredible scenic drive full of sandstone buttes where many famous movies were filmed. It’s located 3 hours northeast of Sedona will be on your way to Moab, Utah. Check out my guide to Monument Valley for more details on how to visit!